New Wreck Off Sydney – Crane Barge

We dived a wreck on the weekend after Scott Willan and I did a Sydney to Pittwater multibeam scan several weeks prior (almost 100nm covering all known wrecks). On Saturday 11th February Scott Willan, Victoria Parr, Grant Joslin and myself went out to dive several of the targets identified including an object approximately 2.8km South East of the wreck of the Birchgrove Park, at position 33° 38.938’S 151° 24.362’E (WGS 85 DD MM.mmm).

The wreck is in 56m and is a crane barge of approximately 25m by 12m with the main deck structure coming up approximately 1.5 meters and 2 elements of the old crane then come up an additional approximately 1.5m above the old deck line. We believe this wreck has found in approximately 2007 and subsequently dived, but the location was never released by the divers.

Conditions on the day were excellent with flat seas, great visibility and an abundance of fish life. The wreck site is well worth a dive, should be easy to find using standard echo sounders and is a great new addition to the shipwrecks in the area.


The only wreck on record that may fit the description is from the ‘Scuttled and Abandoned Ships in Australian Waters’, 1998 Parsons, CRANE BARGE No.4 Owned Maritime Services Bd. Scuttled 12m ESE of Sydney Heads, June 22, 1972, but the location is wildly wrong.

Discovering Andreas’ Wreck

Cruising out of Sydney Harbour, it’d been one year to the day since our good friend lost his life whilst we were exploring the MV Limerick. It only added to our anticipation, as the 70m dive we’d about to undertake was a relative unknown. Armed with more government survey data procured by Scott Willan, we’d previously scanned the site with our depth sounder and had a target in the GPS.

We drop a shot line on the target, gear up and descended. Not much is said, we just get on with the usual business of diving. As we hit the bottom, visibility is only about 3-4m and it’s twilight dark. Squinting, we see the outline of a wreck just out of view which gives us that feeling of relief, knowing we haven’t just done another deep dive to a sandy sea floor.

Together, two of us struggle to drag the heavy anchor and chain of our shot line across the sand to the bow of the wreck. Once there, we shake hands and acknowledge what we’ve achieved, before getting on with business. For me that’s shooting video, for Dave that’s firstly inflating a balloon as a signal to open-circuit divers that we’re on a wreck and to come down.

The current on the bottom is strong, such that we were fighting to hold position as we swam to the stern of the wreck. We can’t see a propeller, or an engine for that matter so we think it’s likely a scuttled ship. Having wasted time with the anchor, we’re quickly at the limit of our dive plan of 40min @ 74m. Reality hits, and we’ve got 2.5 hours of decompression ahead of us.

On deco, surface crew were kind enough to throw down some beers for a little celebration. Although not in the tec diving manual, it’s a welcomed break from the tiny jellyfish that sting my face as they drift past. On the surface, more celebration as we share what we’ve seen and ponder what it could be. At the time, we named it “Andrea’s Wreck” after our lost friend. Subsequent dives and research suggest that the wreck is that of the SS Yamba, but I’ll always remember it as Andreas’ wreck.

Previously Published: Asian Diver No 136 Issue Jan 2015

DIY Digital Intermediate Pressure Gauge

I came across these inexpensive digital pressure gauges a while back whilst looking for a mountain biking tyre pressure solution. Along the way I thought it’d be real nice to have a digital intermediate pressure (IP) gauge for scuba regulator servicing and tests.

The gauge reads up to 200psi (with units in metric & imperial), so is an ideal for reading scuba regulator IP. With a M10x1.0 brass thread on the gauge, I simply scavenged an old BC nipple (most are 3/8″ UNF) and tapped both ends into a piece of Delrin bar stock.

For a $6 solution, the gauge appears as accurate as any analogue one that I have (expensive or cheapo), and perhaps more importantly has mush greater resolution. Line creep is immediately identifiable, so no longer will I squint and stare at a little analogue gauge wondering if it’s moving.

Shark Photography with Mike Ball Dive

Face-to-face with shark – what will you do?

Hold your ground, raise your camera and take the shot you’ve been wanting for years. That’s what we do on the Mike Ball Dive Expeditions’ (MBDE) Shark Shooter Expedition – 6 April 2017. It’s one of my favourite places to dive, jumping into the gin clear water of the Coral Sea, eagerly greeted by hoards of sharks willing to get into photo range. The liveaboard expedition is run on Spoilsport, with presentations and tutorials by me on shark and general photography techniques. Personalised, hands-on workshops are also run both on land and in-water across the 3, 4 & 7 night itineraries for Spoilsport.

Our focus is very much on shark photography, so you can expect to get very close to Grey Reef Sharks, White Tips and commonly the awesome the Silvertips. It’s hammerhead season too, so we should be getting them too! Numerous shark attractions and the legendary Osprey Feed will occur, plus the opportunity to photograph a wide variety of marine life across the Coral Sea and Great Barrier Reef. Join us for a truly inspiring experience!


Strobes vs Video Light for Still Photography

Can video lights be used to replace strobes for still photograph?

I’ve generally answered “NO” to this question, but for off-camera lighting video lights are a simple and effective solution. We put our 10,000 lumen videos lights to the test in Madison Blue Cave (Florida), here’s what we found.

Let me first say that I still don’t believe video lights can effectively replace strobes for on-camera lighting for serious shooting scenarios (ie. those attached to camera). Modern strobes win hands down when it comes to output/intensity, weight, cost and duration. When it comes to off-camera lighting though, high lumen video lights are a viable solution due to simplicity – they provide a “what you see is what you get” approach, avoiding many of the pitfalls that come with managing off camera strobes. Let’s break down the pros and cons associated with each:

strobevlight

Left: Dual Ikelite DS-160s (full power) on divers back; Right: Single LD-100V, handheld under divers arm; Settings for both: 1/80s @ f/10; ISO1250

Video Lights

  • Simple – video lights are simple, not requiring remote triggers and sync cables
  • Real-time – photographer & model can see where the video light is pointed in real-time
  • Availability – video lights are often more on-hand, or people shoot video on same dive
  • Mounting – mounting a video light on a model will quickly become a liability, so you’re limited to handheld use
  • Duration – video lights have a limited burn time compared to strobes
  • Safety – constantly beaming 1000’s of lumens in a cave/wreck reduces communications (and pissed people off!)

Strobes

  • Shutter Speed – strobes enable fast shutter speeds to be used (unlike constant light sources)
  • Duration – you get hundreds of frames with strobes, versus a limited burn-time/shooting wind lights
  • Complexity – strobes require slave sensors and sync cables, and can fail to fire
  • Guesswork – models often have to guess where a strobes beam will fire
  • Mounting – strobes can be mounted on a diver’s back, tanks, etc… hands free & only firing when triggered
  • Cost – bang for buck, strobes will give you more light and shooting time

Of all the variables, shutter speed and duration are perhaps the biggest advantages of strobes. Fast shutter speeds in cave environments gives you crisp images (albeit with the loss of primary light beams), whilst not having to worry about burn-time and power levels is pretty handy.

strobevlight1

Left: 1/200s @ f/10; ISO1250 – Dual DS-160s; Right: 1/60s @f/7.1; ISO1250 – Single LD-100V; Working to the strengths of the video lights can yield great results, pulling the diver off the background wall.

In contrast, video lights win out when it comes to simplicity, real-time viewing and availability (depending on the project/location). What you see is largely what you get, though you will have to shoot with a slow shutter speed to make it work (e.g. 1/60s). Inexperienced models often approach a video light with more familiarity and willingness. Minimizing the distance to subject will also maximize the impact of a video light, so get closer!

As can be seen from our test shots in Madison Blue, off-camera video lights for still photography are a viable tool. You will need to manage certain constraints, but they can enable great shots to be taken in the right environment. Of course, why not mix it up as we recently did in Twin Cave, using strobes, video and primary lights all in one go.

twin

Originally Posted: http://uwlightdude.com/strobe-vs-video-light-for-still-photography/

Every Housing Tells a Story

It feels like finger nails being dragged down a blackboard when you damage your housing. My story is one of abuse, as in my game it’s diver first, getting the shot second and protecting camera kit much further down the priority list. Executing technical dives, I’ve come to realise just suck it up and get on with the job – a quality housing can take it!

I’ve recently been doing some challenging 11811457_934191063286048_6198830764657431373_ncold water diving in Finland (4C), where I was happy to say the Nauticam didn’t miss a beat and functioned 100% even with dry gloves at 300ft (or ‘no can do gloves’ as the locals call them). Okay, I treated it more like a deco cylinder and got a few dome scratches – Micromesh and a few beers will fix that tonight. As to the housing body, well it’s lost some anodising and has taken a beating over years, but so what?

When you get your hands dirty, so does your gear. Buttons push, knobs turn and images come in the front just the same. If you’re too focused on camera gear protection, you might just miss out on that shot you want.

What story does your housing tell?

Pimp My Ride – Lithium Cuda DPV

MISSION: Replace my dead Cuda 400 Nimh battery with a lithium solution, offering greater range and increased power.

Like many projects, this one turned out to be more work than I thought. In the end though, I’ve turned my Cuda into an 800 monster that rides smooth and hard.

The Battery

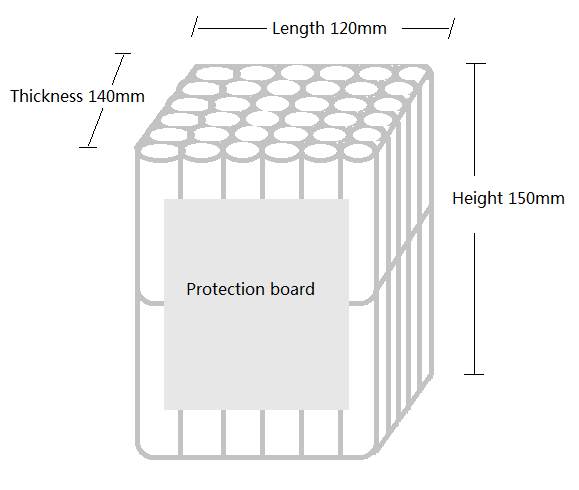
My initial attempts to purchase one of the commercially available lithium solutions all proved to be a dead ends when it came to shipping to Australia. Establishing the battery specifications was pretty straight forward, and a 12S 43.2V(12 x 3.6v) solution seems an almost perfect match for the Cuda control system in terms of max and min voltage. I also felt no need to max out the lithium content, as 830whr will give me adequate range and was a relatively simply build for the battery guys. Getting it shipped to Australia, well that’s another. Eventually I got the following pack landed in Oz for US$815 from a Chinese supplier who I’ve used with very good results in the past.

Voltage: 43.2V (50.4V fully charged) – 12S6P
Capacity: 19.2Ah / ~830whr
Cells: Panasonic NCR18650BD (10A rated)
Chemistry: Lithium ion
Protection: Balancing BMS – 45A continuous rated
Dimensions: 140x120x150mm

Dimension 800 Pack


The Installation

Installing the pack required modification to the battery case lid; shaving 2.7 mm off the inside as the lengthwise fit is tight. In the end I got the battery in the nose, sealed as per stock battery. Charging can be done in situ via draw lead, so no need to remove for charging so a big advantage over the stock solution.

The lithium is lighter, so needed about 2kg of lead in the nose. Needs some minor tweaks, but trim is no issue with Delrin x-prop. There is a bit of lead shot in the tail still, but I’m not sure whether this would be enough to trim out a metal x-prop level…Not shown in the picture below, there is a 6mm alloy plate bolted to the casing lid, I think milled out a recess and positioning plates to hold the battery it. A cam strap and good old bungee stops it moving. Weights just cabled tied in, but it’s pretty solid. I’ts a little hacky, but it’ll rarely come out of the nose so I wasn’t fussed about creating a pretty case.

Controller_Cover      battery_install


The Electronics

My first dive didn’t go so well…it was like stalling a race car on the front row of the grid. I quickly found out the older Cuda electronics (ESC – side mounted one) does not seem to handle the higher power possible with the new pack. The voltage range is ok, but the higher voltage means higher current and the old controller seems to freak out (stuttered running, loss of power) at speeds 4+. I tested this on another Cuda 400 with the old electronics and it failed in a different way, simply cutting off at speeds 5+.

After discussions with the factory I decided to upgrade to the new programmable Cuda electronics. On paper the advantage is that they’re programmable, but they’re obviously cable of more power throughput. Once installed this bad boy did the trick.

The factory supplied parts leaves the controller exposed on top of the motor guard plate – I didn’t like this. To provide added protection, I used the old motor guard as an electronics guard, and just simply stacked another level on. The upper level Delrin post extensions are 25mm long, and M5x60mm socket head bolts did the trick nicely to clamp it in.
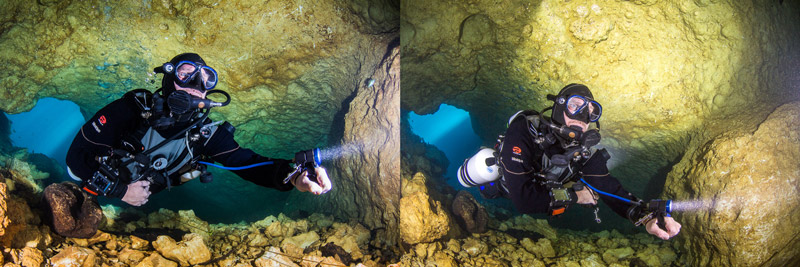
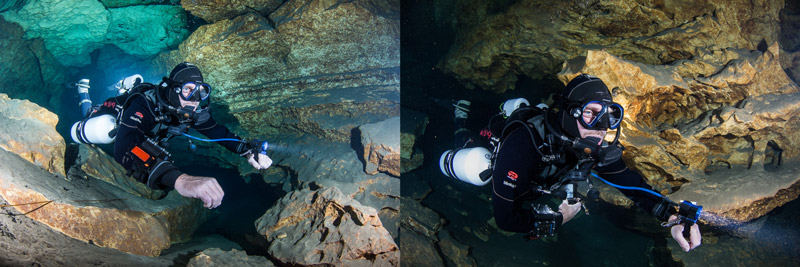
The Experience

It’s early days, but so far it runs like a mean machine. Seems notably smoother and has more thrust than previous Cudas I’ve used with the old electronics (anecdotal observation). My Cuda used to have a very minor slippy/stutter/shaky nature at high speeds with the 400 Nimh and old controller – though now it’s gone and runs on max extremely smoothly. I’ve not changed the default programmed setting on the controller, so the 400 Nimh will just drop in without a problem.

The Costs

Battery: US$815 inc charger (landed in Oz)
Battery Lid: ~$150 or use old one (requires lathe to modify)
Newer Electronics: US$465 (assuming Cuda has old electronics)
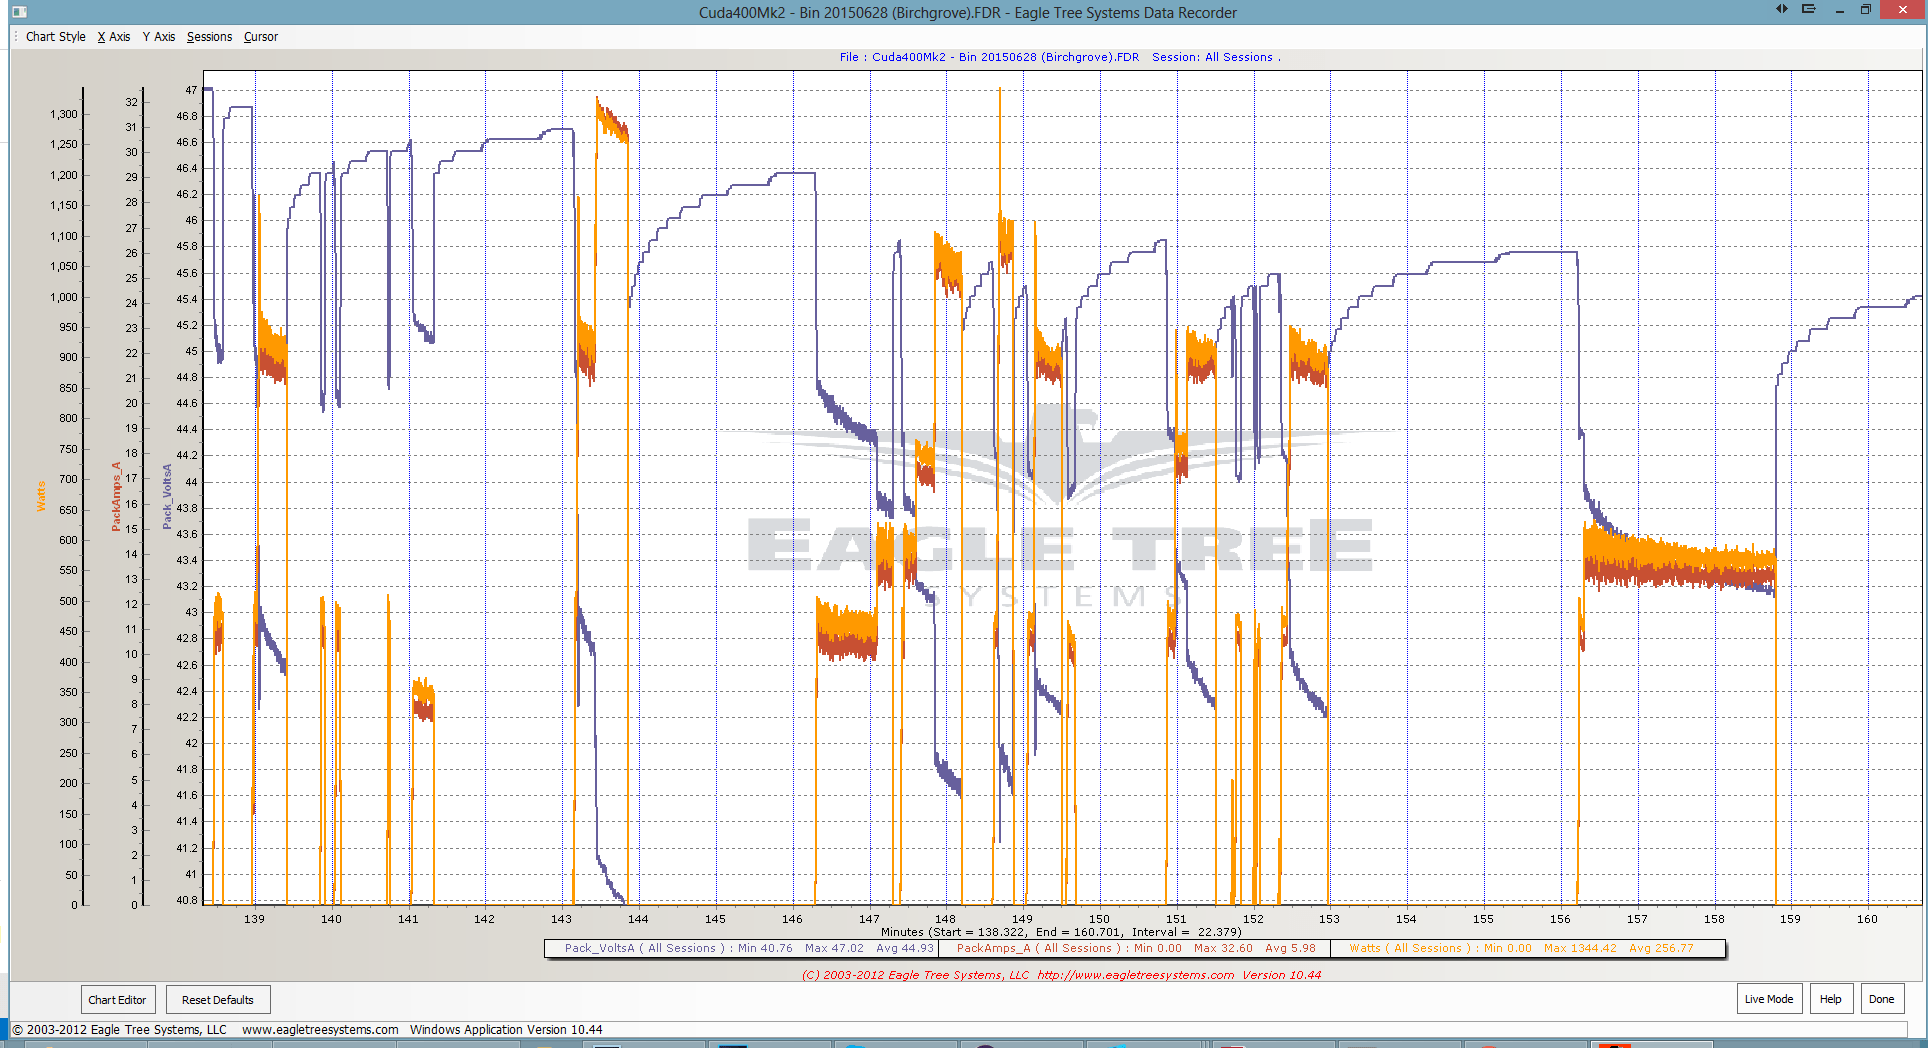
The Data

An Eagle Tree data log of one dive can be found here. I’ll post a full burn down data log file once I get time.

EagleTree

New Wreck Found Off Sydney – Andreas’ Wreck

Thanks to the tireless detective work of Scott Willan, we were fortunate enough to find and dive a new wreck off Sydney heads over the long weekend. The wreck, as yet to be identified is a small vessel that we guess is about 40m in length, now sitting in 72m of water. The hull is largely intact however the absence a boiler or engine strongly suggest the wreck to be scuttled.

Our initial dive was only 37min on the bottom, so we’ve more questions than answers at this stage. Conditions on the day weren’t the best, with limited vis and poor lighting. We did find small glass and porcelain artifacts, as well as coal on the site. Future dives to the site will allow us to measure the length accurately and hopefully use historical records to identify the wreck.

The site was reported to NSW Herritage this morning, and is located at 33 50.828’S 151 21.103’E (WGS 84 DD MM.mmm).

As we dived the wreck on the anniversary of our good friend’s death, and in lieu of a name we’re referring to the site as Andrea’s Wreck. RIP mate! Thanks to the whole team, Scott Willan &  Dave Wood (divers) and Geoff Cook and Victoria Parr as excellent boat crew.

A story has also now been published in the Telegraph.

Nautilus Lifeline – Flood Protection

Flooding a camera, or any electronic equipment on a dive sucks (I’ve not better way to put that). Sadly I flooded my Nautilus Lifeline (NL) on a deep dive a while back, which appears to be caused by the latch being popped open underwater.

I’ve taken to a more risk managed approach with my replacement, as I saw this done on the MV Spoilsport units. One modification is to use a loop of bungee (shock cord) around the body of the unit. It prevents the latch being opened accidentally, and therefore saves a flood. Simple, but effective…


Mike Ball Shark Shooter 2014

“ERROR: CARD FULL!” Usually that’s the last thing you want to see on your camera underwater, but after 90 minutes shooting sharks it meant my camera was full of images. My card was full because I’d gone wild on the trigger, but it wasn’t my fault. Sharks just kept coming, and by that I mean kept coming closer.

The scene was set as the previous day we’d had one of the best shark feeds that I can recall at North Horn. Sharks were wall to wall, almost too many to count. Today though, was a day of attractions; we wouldn’t feed the sharks but simply attract them close with tuna heads in a metal cage. The calmer environment highlights the more natural behavior of the animal and provides a better shooting opportunity in my opinion.

Dive 1 – Admiralty Anchor, a nice sheltered reef system with great coral, sheer walls and undulating topology.DSP_7533 Don’t be fooled though, the site is one of Osprey’s best and as we’d later find out can turn on some mega shark action. The morning was all about whitetip reef sharks – close and calm.

Dive 2 – We’re at natural shark cleaning station on North Horn, which was also the site of the shark feed the previous day. Our mere presence draws attention and as we splash into the gin clean water, 20-30 sharks are buzzing around under the boat. In goes my friend “Mr Tuna Head”, now we’re talking 30-40 sharks and the tension mounts. We now had sharks galore, close range encounters and near perfect shooting conditions in terms of shark engagement, water clarity and gorgeous blue mid-morning light.

DSP_6883With our trusty minder Nick watching our backs and keeping safety in check, we had prime position on a coral bommie (mound) that offers 360 degree shooting as sharks circles and approach. For me the key thing is the calm nature of the animals, as opposed to the feed which is impressive, but differs significantly from a shooting perspective. Ultimately today we had time, opportunity and all came out shots with shots we were proud of.

Dive 3 – Another attraction, though the current was flowing into the lagoon at a fairly strong rate. We staked out our prize tuna and waited. What we got this time was the smaller sharks from inside the lagoon, juvenille grey reefs (30-50cm) that seeming don’t know their place in the world. At times erratic, they’re cool too see and eventually make way for bigger sharks to come past. More white tips joined us until we had to go.

Dive 4 – I’d just got out of the water and was told “there’s one tuna head left, we’re doing back to Admiralty Anchor”, which of DSP_7637course always brings a smile to my face. In we went and it didn’t take too long before a 3.5m silvertip made itself known as we poked at this tuna head. Soon enough there were two, then three, and ultimately five silvertips circling the area. An impressive sight anywhere in the world, these animals have a grace that’s hard to describe. Unfortunately with daylight fading it proved challenging to capture them well, but what an exciting dive I had!

At the end of the day I said that it was one of the best days diving I’d done in nearly 20 years. I’d shot over 1600 pictures, had some photos in my camera that were great, and more importantly had a smile on my face from ear to ear. The challenge has been set – a tuna head on every dive for next year’s 2015 Shark Shooter workshop…

More images available here.