Boat Anchor Retriever

I know there are a lot of boat anchor retrievers on the market, though I’m sharing a cheap rope ascending device that has served our specific use case nicely. The problem was that the usual marine devices didn’t work well, or at all, with the 8mm silver shot lines we prefer for deep wreck drops. We only use a variety of shot lines, with variable chain lengths and anchor sizes so the loop/ring types that run through the chain didn’t suit either.

We’ve found this rope climbing ascender however has been great for several years now, and seems to run down the line with little resistant, but cam locks on the return pull very well (even on the cheap, slippery 8mm line). I was skeptical as to whether it would hold up in the salt water, but it’s been going strong for years with no maintenance at all.

For under $20, it’s hard to beat as an anchor retriever – though personally I’d stick with a more reputable brand for rock climbing.

AIS SMB

AIS Enabled SMB Beacon

For years I’ve wanted a solution that can provide real-time tracking for divers underwater, now we have a one. AIS is a marine radio positioning system that at is simplest, broadcasts a vessel’s GPS position for other to track. The system however can be leveraged to send the non-emergency position of other objects drifting in the ocean such as fishing nets, or in our case divers underwater. The signal is then received by the boat’s VHF radio and displayed on the chart plotter.

The conceptual solution is relatively simple; get a low cost Chinese fishing nets AIS beacon and attach it to an SMB that is deployable by divers drifting in the ocean. The problem until recently was putting this in a form factor that isn’t a burden to carry and/or use on deep technical dives. The issue we faced originally was finding a AIS electronics solution in the right form factor, most were large and didn’t suit small diameter pressure housing used underwater. Mounting the antenna in the vertical seam of the SMB was also presented problems (mostly reliability over time).

More recently, low cost and narrow form factor AIS beacons have appeared on the market. I recently took one of these, did some minor tweaks to the antenna, extending the wiring and folding it back on along the board to make it short. I knocked up a pressure rated housing and like magic you have an AIS enabled SMB.

Usage is simple…turn the unit on pre-dive, validate signal on boat plotter, seal canister and dive. Divers then launch the SMB from the bottom as per normal and when the SMB reaches the surface the GPS signal is sent to the boat. The advantage is that the boat gets an active position signal from divers that may have hours remaining to surface.

The solution isn’t perfect, with these issues:

  • Range is yet to be tested and is likely compromised by the antenna being laid back against the battery and circuit board (versus sticking out the end on the OEM solution)
  • Size of SMB seems to matter; I purposely used a small one for initial tests though I’m planning to upsize this. The smaller SMB too 6-9lbs of negative weight to get the SMB erect
  • The AIS beacon I used doesn’t allow programming of MMSI and ping intervals
  • The AIS beacon I used doesn’t seem to be available anymore online, though similar one is here and allows programming MMSI

For interest sake we also carry the Nautilus LifeLine and housing PLBs on deep drift deco dives, but both require the diver to surface which could be hours if initial traditional SMB are not sighted by the boat. We’ve done drift dives in up to 5kts of current which is problematic to say the least. The AIS SMB is simply another tool in the bag to ensure the boat reacquires divers promptly.


DIY Digital Intermediate Pressure Gauge

I came across these inexpensive digital pressure gauges a while back whilst looking for a mountain biking tyre pressure solution. Along the way I thought it’d be real nice to have a digital intermediate pressure (IP) gauge for scuba regulator servicing and tests.

The gauge reads up to 200psi (with units in metric & imperial), so is an ideal for reading scuba regulator IP. With a M10x1.0 brass thread on the gauge, I simply scavenged an old BC nipple (most are 3/8″ UNF) and tapped both ends into a piece of Delrin bar stock.

For a $6 solution, the gauge appears as accurate as any analogue one that I have (expensive or cheapo), and perhaps more importantly has mush greater resolution. Line creep is immediately identifiable, so no longer will I squint and stare at a little analogue gauge wondering if it’s moving.

Strobes vs Video Light for Still Photography

Can video lights be used to replace strobes for still photograph?

I’ve generally answered “NO” to this question, but for off-camera lighting video lights are a simple and effective solution. We put our 10,000 lumen videos lights to the test in Madison Blue Cave (Florida), here’s what we found.

Let me first say that I still don’t believe video lights can effectively replace strobes for on-camera lighting for serious shooting scenarios (ie. those attached to camera). Modern strobes win hands down when it comes to output/intensity, weight, cost and duration. When it comes to off-camera lighting though, high lumen video lights are a viable solution due to simplicity – they provide a “what you see is what you get” approach, avoiding many of the pitfalls that come with managing off camera strobes. Let’s break down the pros and cons associated with each:

strobevlight

Left: Dual Ikelite DS-160s (full power) on divers back; Right: Single LD-100V, handheld under divers arm; Settings for both: 1/80s @ f/10; ISO1250

Video Lights

  • Simple – video lights are simple, not requiring remote triggers and sync cables
  • Real-time – photographer & model can see where the video light is pointed in real-time
  • Availability – video lights are often more on-hand, or people shoot video on same dive
  • Mounting – mounting a video light on a model will quickly become a liability, so you’re limited to handheld use
  • Duration – video lights have a limited burn time compared to strobes
  • Safety – constantly beaming 1000’s of lumens in a cave/wreck reduces communications (and pissed people off!)

Strobes

  • Shutter Speed – strobes enable fast shutter speeds to be used (unlike constant light sources)
  • Duration – you get hundreds of frames with strobes, versus a limited burn-time/shooting wind lights
  • Complexity – strobes require slave sensors and sync cables, and can fail to fire
  • Guesswork – models often have to guess where a strobes beam will fire
  • Mounting – strobes can be mounted on a diver’s back, tanks, etc… hands free & only firing when triggered
  • Cost – bang for buck, strobes will give you more light and shooting time

Of all the variables, shutter speed and duration are perhaps the biggest advantages of strobes. Fast shutter speeds in cave environments gives you crisp images (albeit with the loss of primary light beams), whilst not having to worry about burn-time and power levels is pretty handy.

strobevlight1

Left: 1/200s @ f/10; ISO1250 – Dual DS-160s; Right: 1/60s @f/7.1; ISO1250 – Single LD-100V; Working to the strengths of the video lights can yield great results, pulling the diver off the background wall.

In contrast, video lights win out when it comes to simplicity, real-time viewing and availability (depending on the project/location). What you see is largely what you get, though you will have to shoot with a slow shutter speed to make it work (e.g. 1/60s). Inexperienced models often approach a video light with more familiarity and willingness. Minimizing the distance to subject will also maximize the impact of a video light, so get closer!

As can be seen from our test shots in Madison Blue, off-camera video lights for still photography are a viable tool. You will need to manage certain constraints, but they can enable great shots to be taken in the right environment. Of course, why not mix it up as we recently did in Twin Cave, using strobes, video and primary lights all in one go.

twin

Originally Posted: http://uwlightdude.com/strobe-vs-video-light-for-still-photography/

Every Housing Tells a Story

It feels like finger nails being dragged down a blackboard when you damage your housing. My story is one of abuse, as in my game it’s diver first, getting the shot second and protecting camera kit much further down the priority list. Executing technical dives, I’ve come to realise just suck it up and get on with the job – a quality housing can take it!

I’ve recently been doing some challenging 11811457_934191063286048_6198830764657431373_ncold water diving in Finland (4C), where I was happy to say the Nauticam didn’t miss a beat and functioned 100% even with dry gloves at 300ft (or ‘no can do gloves’ as the locals call them). Okay, I treated it more like a deco cylinder and got a few dome scratches – Micromesh and a few beers will fix that tonight. As to the housing body, well it’s lost some anodising and has taken a beating over years, but so what?

When you get your hands dirty, so does your gear. Buttons push, knobs turn and images come in the front just the same. If you’re too focused on camera gear protection, you might just miss out on that shot you want.

What story does your housing tell?

Pimp My Ride – Lithium Cuda DPV

MISSION: Replace my dead Cuda 400 Nimh battery with a lithium solution, offering greater range and increased power.

Like many projects, this one turned out to be more work than I thought. In the end though, I’ve turned my Cuda into an 800 monster that rides smooth and hard.

The Battery

My initial attempts to purchase one of the commercially available lithium solutions all proved to be a dead ends when it came to shipping to Australia. Establishing the battery specifications was pretty straight forward, and a 12S 43.2V(12 x 3.6v) solution seems an almost perfect match for the Cuda control system in terms of max and min voltage. I also felt no need to max out the lithium content, as 830whr will give me adequate range and was a relatively simply build for the battery guys. Getting it shipped to Australia, well that’s another. Eventually I got the following pack landed in Oz for US$815 from a Chinese supplier who I’ve used with very good results in the past.

Voltage: 43.2V (50.4V fully charged) – 12S6P
Capacity: 19.2Ah / ~830whr
Cells: Panasonic NCR18650BD (10A rated)
Chemistry: Lithium ion
Protection: Balancing BMS – 45A continuous rated
Dimensions: 140x120x150mm

Dimension 800 Pack


The Installation

Installing the pack required modification to the battery case lid; shaving 2.7 mm off the inside as the lengthwise fit is tight. In the end I got the battery in the nose, sealed as per stock battery. Charging can be done in situ via draw lead, so no need to remove for charging so a big advantage over the stock solution.

The lithium is lighter, so needed about 2kg of lead in the nose. Needs some minor tweaks, but trim is no issue with Delrin x-prop. There is a bit of lead shot in the tail still, but I’m not sure whether this would be enough to trim out a metal x-prop level…Not shown in the picture below, there is a 6mm alloy plate bolted to the casing lid, I think milled out a recess and positioning plates to hold the battery it. A cam strap and good old bungee stops it moving. Weights just cabled tied in, but it’s pretty solid. I’ts a little hacky, but it’ll rarely come out of the nose so I wasn’t fussed about creating a pretty case.

Controller_Cover      battery_install


The Electronics

My first dive didn’t go so well…it was like stalling a race car on the front row of the grid. I quickly found out the older Cuda electronics (ESC – side mounted one) does not seem to handle the higher power possible with the new pack. The voltage range is ok, but the higher voltage means higher current and the old controller seems to freak out (stuttered running, loss of power) at speeds 4+. I tested this on another Cuda 400 with the old electronics and it failed in a different way, simply cutting off at speeds 5+.

After discussions with the factory I decided to upgrade to the new programmable Cuda electronics. On paper the advantage is that they’re programmable, but they’re obviously cable of more power throughput. Once installed this bad boy did the trick.

The factory supplied parts leaves the controller exposed on top of the motor guard plate – I didn’t like this. To provide added protection, I used the old motor guard as an electronics guard, and just simply stacked another level on. The upper level Delrin post extensions are 25mm long, and M5x60mm socket head bolts did the trick nicely to clamp it in.

The Experience

It’s early days, but so far it runs like a mean machine. Seems notably smoother and has more thrust than previous Cudas I’ve used with the old electronics (anecdotal observation). My Cuda used to have a very minor slippy/stutter/shaky nature at high speeds with the 400 Nimh and old controller – though now it’s gone and runs on max extremely smoothly. I’ve not changed the default programmed setting on the controller, so the 400 Nimh will just drop in without a problem.

The Costs

Battery: US$815 inc charger (landed in Oz)
Battery Lid: ~$150 or use old one (requires lathe to modify)
Newer Electronics: US$465 (assuming Cuda has old electronics)

The Data

An Eagle Tree data log of one dive can be found here. I’ll post a full burn down data log file once I get time.

EagleTree

Nautilus Lifeline – Flood Protection

Flooding a camera, or any electronic equipment on a dive sucks (I’ve not better way to put that). Sadly I flooded my Nautilus Lifeline (NL) on a deep dive a while back, which appears to be caused by the latch being popped open underwater.

I’ve taken to a more risk managed approach with my replacement, as I saw this done on the MV Spoilsport units. One modification is to use a loop of bungee (shock cord) around the body of the unit. It prevents the latch being opened accidentally, and therefore saves a flood. Simple, but effective…


Mini Review: Nauticam NA-5D mkIII Deep Test

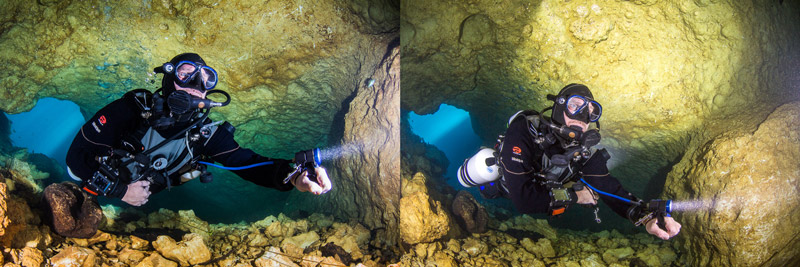
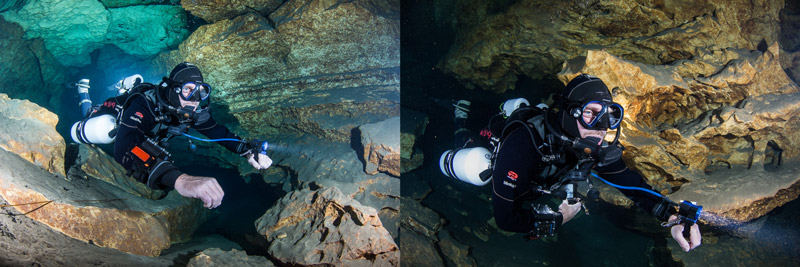
Descending down a vertical wall in the Coral Sea, I watched the depth exceed the 100m rating provided by Nauticam and thought to myself “I hope the engineers I spoke to really know their stuff!”. Stopping at a 125m (410ft) to observe a deep sea fan, I paid some attention to life support before testing out the functionality of the 5D mkIII housing.  I’m glad to say, there were no leaks, no creaks, and no issues of any kind.

I took the Nauticam NA-5D mkIII housing on a Deep Reef Coral Sea project with Mike Ball Dive Expeditions, for both still and video work. The real question was ‘how deep can the housing go and function properly?’. The absolute depth is still unknown, but I’m happy to say it functions perfectly at 125msw (410ft) and no signs of pressure related issues were observed.

My first impression was that Nauticam have come a long way since I’d last looked at one. Specifically the controls were very impressive, such that the primary underwater controls had been routed to your fingers tips, rather than the easier solution of just putting a hole through the housing to engage a camera button at the closest location. Examples of this advanced ergonomics include the Start/Stop, ISO and Playback buttons, which are all thumb paddles (not small push buttons). The piano keys for Set and Q-Menu were also nice; the latter prompting me to actually use the function which had not been something I’d liked on other housings.

I experienced no issues with stuck buttons, problematic control or knob issues, which are typical problems when housings are taken near or past their rated depth. Nauticam engineers said their 100m rating was based on what they could functionally test with their vacuum machine, rather than what the housing could actually handle. As such, I took up the challenge of actually testing it in the field at that depth. I should also mention that I tested the 8.5” acrylic dome, not the glass one, which the engineers weren’t as confident with past the 100m rating.

The shutter release, shutter speed, aperture and zoom control all worked as advertised – and actually were very responsive with positive feedback. I had no issues with the housing after a week of deep diving, with most dives in the 70-80m range. The grips seem to have evolved a fair bit since I’d last looked at them, with the stainless steel brackets at the top of the grips providing a fair bit of rigidity which was nice.

Assembly of the housing was something that impressed me. The ports and extensions are easy to seat and lock (out of the box – including past the extension to dome), and the markings make it simple for a first time Nauticam user like myself to put together. I will confess to p_278_2having to resort to the manual to understand the port extension locking mechanism, as I assumed this would unlock from the housing side (which it does not), but I was quickly in the water a few minutes minute later.

A nice feature of the Nauticam solution was the Flash Trigger for Canon cameras, which allows optic fibre strobe syncing to be used. On technical dives I often sling my camera or push it through a restriction in a cave  or wreck. Not having to worry about cutting or breaking a wired sync chord is just a nice and something I miss since switching to the 5D MKIII.

Buoyancy Arms

One problem with an SLR setup and very deep diving is the weight of the setup. A heavy rig will increase your breathing rate (particularly shooting video), and at serious depths (e.g. > 90m/300ft), the increased work of breathing (or breathing resistance) on a closed circuit rebreather can be life threatening.

Carbon_Fiber_Arms_1

One solution is to use buoyancy arms, though to date the solutions I’ve seen and used have been sub-optimal. Stix float arms work in shallow depths but compress massively past about 40m – incidentally they return to form when you come back up which is quite interesting for such hard foam.

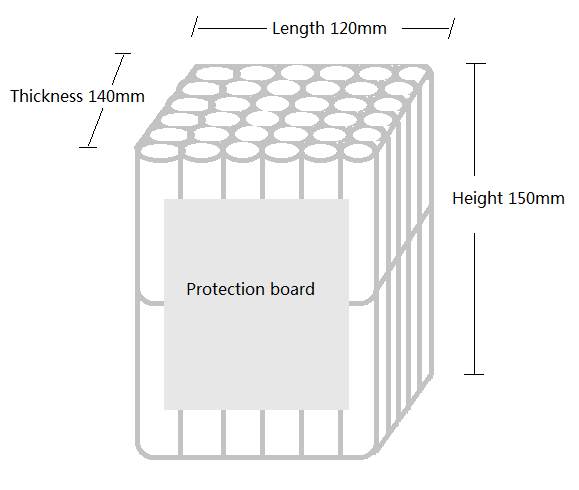
For a while now, I’ve been testing the Nauticam Carbon Fibre Float Arms in 12” configuration. Also rated to 100m, these had not problems at 125m and have seen repeated dives to depths in excess of 100m over the last few months. Nauticam apparently reinforced the inside with a honeycomb structure in order to ensure no flexing ad depth, which might otherwise crack the carbon fibre and cause leaking.

With the 60x300mm (12”) float arms and 8.5″ dome, I found the Nauticam rig to be far too buoyant. The same arms were perfect on my Aquatica setup (with 8″ dome), but the Nauticam housing is not as negative so the 200mm (9”) arms would suit better I think as I like my rig to be slightly negative rather than positive.


Configuration for Deep Dives:

Model: Nauticam NA-5DMKIII

Dome: 8.5” Acrylic Dome Port (18802)

Extension: Extension Ring 70 with 70 (21170)

Lens: Canon 16-35mm f/2.8 II USM

Strobes: 2 x Inon z-240s /w Optic Fibre Sync via Nauticam Flash Trigger

Viewfinder: 180° viewfinder

Focus Light: Fisheye Fix Neo 2000W /w 6” arm


Disclaimer: A test housing and peripheral equipment was provided by Nauticam for the purposes of testing and review.


Last Single Point of Failure

As I descend rapidly with my trigger finger hard against the DPV throttle, I begin to realise that the little trickle of water running down my neck isn’t just a little leak, but instead has quickly turned into what feels like a geyser. Before I know it I’m on the bottom in 80m with a fully flooded suit thinking “How did this happen?”. I quickly got out of Dodge before my predicament went from unpleasant in the 20C water, to life threatening an hour or two later.

The cause of my drysuit flood turned out to be the SI Tech silicon neck seal, which had pulled out of the ring that holds it in the suit. I suspect it pulled out progressively whilst doffing, though can’t be certain. What I do know for sure if that I’ll be inspecting my drysuit before any major dives in future, as I was meant to be diving the SS Federal in 120m on that day, so was lucky it happened on a Sydney wreck instead.

Complacency is also a factor in my demise here, as I had a minor leak on an earlier dive last (presumably due to a milder version of the same fault). I failed to inspect my suit, which would have trapped the error. An overwhelming sense of “she’ll be right mate” and laziness is no doubt to blame, which is stupid when you consider thermal protection is really the last single point of failure in our technical diving configurations.

On a side note, I’ve otherwise found the Si-Tech silicon neck and wrist seals to be both comfortable and reliable.

Nautilus Lifeline – An 18 month review

I eagerly awaited the arrival of my Nautilus lifeline (NL) some 18 months ago, and have carried it on every ocean dive I’ve done since (sorry guys, I’ve no logbook so can’t tell you how many dives it has done, but we’re talking 200-300). I’m pleased to say that I’ve not yet had to use it in anger, which is a pretty good thing in my book. With the unfortunate demise of my old website, so too was my old NL information page lost so I thought I’d build a new one.

I do a lot of deep diving, which regularly means long drifting decompression in the ocean under a surface marker buoy. Now if everything goes to plan, we deploy the buoy from depth and the boat will track the drifting buoy and pick us up several hours later, and often 5-10 miles from the original dive site. This is where the NL comes in, if the boat misses the buoy or leaves the site without us (intentional or not), I’ve got a last stand defense against being left in the ocean bobbing like a cork.

Our limited range tests of the unit worked fine, though I took away a few points:

  • Turn the volume up, as on a windy day in the ocean the lower volumes are difficult to hear (you’ll definitely need to remove your hood too)
  • The 3 second delay between when you push the talk buttons and when the voice communications actually get transmitted is far from intuitive. It contravenes normal radio operation and from my experience makes communications difficult if the user is unaware of this (easy to do in an emergency)
  • Hitting the RED button to initiate a DSC distress call is very easy to do, much more so than talking over a radio (particularly under stress). This is also well safeguarded against accidental presses too
  • Although changing the assigned VHF channel of either talk button in water is a feature, doing so is impractical and not something I plan to do (take charge of the VHF conversation and dictate channels to the other party)
  • The unit is positively buoyant and will float, though I still think a secure wrist tether is a necessary evil when using it to allow a hands free mode to attend to other tasks
  • I’m not too sure about the merit of the flashing strobe, it seems a little weak to be seriously useful but I’ve not real data to back this up
  • Replacing the USB charging cap is easily forgotten

Some features I’d like to see in the unit are:

  • A back-lit display and/or buttons (though I concede this may come with a serious power usage problem).
  • The ability to send an information based Digital Selective Calling (DSC) message (e.g. position report), as well as the distress message via an independent button.

Generally speaking the unit is small enough to fit in a dry suit pocket with ease, has a great depth rating of 130m (something we’ve tested many times), and the battery life in standby modes seems to be quite respectable (i.e. I’ve not noticed any dramatic drop in the battery level whilst not in use). If you haven’t read between the lines, I’m a big fan of this device and think it is worth every cent.

VHF Certification, DSC & MMSIs

Now this is where it starts to get a little silly. In Australia in order to use any VHF radio one is required to have a Marine Radio Operator VHF Certificate of Proficiency (MROVCP), which you need to do a short course and exam for (cost is about $150). As far as I can tell, anyone can use a VHF radio in the event of an emergency; that is if you were a passenger on a boat and the skipper (captain) was lost at sea you’d be fully entitled to pick up a VHF radio and call for help; or better yet initiate a DSC distress call. I ask then why can’t someone carry a NL and only use it in an emergency? The answer in my view is nothing, but I am NOT a lawyer and can’t confirm the law on this matter.

Unfortunately to enable the RED distress button you need to have a MMSI. In Australia these are issues by AMSA and also require a MROVCP, so to get the full capability out of the NL you need to do the course. What I also learnt in my VHF journey is that in other parts of the world MMSI numbers are issued freely (e.g. http://www.boatus.com/MMSI/), and that you can practically put any 9 digit string into the NL in order to enable the DSC feature. The one down side to using a fake MMSI (or one not issued in Australia by AMSA for Australian waters), is that in Australia when the DSC distress call is initiated, the MMSI won’t be able to be reconciled against a database of MMSI numbers. I’m no expert here, but I’m sure the rescue agencies will still come and get you, and boats in the immediate area don’t have that database anyway so will be none the wiser. I consider this analogous to an international yacht travelling into Australian waters and making a DSC distress call with a foreign MMSI.

Boat Information Card

As I dive on many boats, commercial and private, I’ve put together this little card that I give to new skippers (captains) that describes the NL and how I use it. from my experience to date I’ve found that skippers are very welcoming of such information as many had never heard of the NL before. I’ve also encountered about 20-30% of commercial charter boats that don’t have DSC enabled VHF radios, and slightly more recreational boats without them too as VHF is more of a commercial frequency in Australia. On the back side I’ve also included our red/yellow surface marker buoy protocol, though I understand this may not be everyone’s cup of tea. For reference, here is a word document for those wanting to do a similar thing – the template is free and re-use or modification is welcome without permission.

nautilus-card


Disclaimer: I don’t sell or have any relationship with Nautilus Lifeline. I paid full retail for my unit and am just sharing my experiences with fellow divers and boaters in order to increase safety.